25 May 2016

Journey to the East (of Jeju Island) - Illustrations and Webtoon-Snippets

This post will be a little different. There's no mention of makeup (gasp!) and there's mostly just photos instead of drawings.

I wanted to introduce the region of South Korea I've been living in for now nearly three years, namely the east of Jejudo or Jeju Island, including Pyeongdae, Sehwa (and its markets) as well as Hado.

Sketch of Sehwa-Ri, 2014

Most of the imagery that's shown of Jeju is somewhat beach-life-related, so instead I'll be taking you on a little tour along one of the countless hiking routes that lead around the whole island. Still lots of beaches, though. The trails are called Ollegil and one of them actually goes by where I live (as in, five meter distance from doorstep to hiking trail) so I'm a bit protective of these. Swiss ambassador for Jeju Olle hiking trails, right here!

On that note: My self-painted doorstep for the Bistro Gris.

The sun is intense on Jeju, so I did slap on some 50 SPF sunscreen (and well, since this IS a makeup blog, too, I'll mention that it was an innisfree one. Surprise.) and a hat. Looking like a ghost I made it through the afternoon without getting burnt (my hands and neck were another story... I need to get out more...)


Selfie before moving out! 
While there are some signs and menues translated into English, you might want to brush up on some Korean vocabulary when traveling outside of large cities. 
When my parents were visiting, I drew them a little language survival map, Jeju specific version. So, let's grab that and go!

First, there's the village we live in (husband, cat and me), Pyeongdae-ri. Located on the north-eastern coast of Jeju in the region called 'Gujwaeup', and Olle gil 21 is the one leading from the village eastwards. While we do technically live in the region of Pyeongdae-ri, we're so far on the outskirts that Sehwa-ri, the next village over, is much closer.

So, that's where we live and where the Bistro Gris is located. On we go!


Leave behind your cat... (sorry)

... and follow the trail until you reach the seaside of Sehwa. 
As with many of the small villages around Jeju, there's a lot of growth happening. While the east of the island is a lot more rural than the more touristy south or west (not to even mention the north and Jeju City), the last two years have seen a bit of an explosion in little cafes, guesthouses, rental houses, cute little shops, fleamarkets, farmer markets and of course tourists. While the large tourist groups (be it Chinese or Korean) visit mostly the south, the east has become popular among young couples, groups of friends or just in general people that want a more relaxed vacation. 

This makes for some interesting contrast, because old and new clash together quite a bit.

There's new dessert cafes next to seafood restaurant that have been there for decades. Agriculture and fishing are everpresent, but so are selfie-shooting tourists and modern guesthouses. 

If you pass Sehwa harbor on a saturday, you'll notice a lot of people gravitating towards the largest pier. That's the '벨롱장' (Bellongjang? Vellong?) flea market happening - which isn't really a flea market, since you won't find second-hand goods.

Missing Hedwig... :'(

 Instead, there's a lot of small stalls selling handmade necklaces, hats, pottery, woodwork, artfully woven hangings, hand-sewn mobiles, embroidery and decorations, as well as food and drinks. 


We even found kebab and mango lassi. There's freshly baked bread, bretzels, lots of juice and coffee, and a little fire to roast marshmallows over. 
The stalls tend to change a lot, so you might want to visit again soon... it's also been growing steadily over the last two, three years (when it started out with only a couple of tables) and keeps on growing!

If Saturday is not an option, try visiting on a day where the 오일장 / O-Il-Jang / Five-Day-Market is held. The 5th, 10th, 15th... and so on of every month. Less cute little stalls, more traditional restaurants, fried food, fresh vegetables, fruit and fish. 
The Oiljang is held in a roofed but open-walled building right next to the harbor - hard to miss, especially on market day!


Well, no luck there today.

So go on ahead for a few more minutes, and take some pictures at these cute little phot zones in front of the seaside cafes. 


Don't worry if you couldn't go to either market - you won't famish on the road. There's a lot of places selling dessert and coffee, as well as traditional restaurants. 

It starts like this...

... and keeps on growing. 
 Now that shopping and eating are out of the way, it's time to, you know, actually hike.

The Jeju Olle Trails are quite forgiving. While there are some sections that take up an entire day of walking, most can be done in three to six hours. And as long as they aren't leading into the mountains, you can more or less walk them in sandals (say hello to bugs and mosquitos, though).


There's simple markers in the form of ribbons guiding the way.

Say goodbye to the sea... for now!
After Sehwa, the trail will lead inland once it reaches the Haenyeo (Diving Women) Museum. If you've got enough time, take a look at that, too. The diving women are a part of Jeju's culture even today and the museum gives some insight into their past, too.

Depending on the season, you'll be able to see them diving in the sea anyways, or pass by large amounts of seaweed drying on the streets. 


An older sketch depicting the avid seafood collecting ajummas.


You'll probably also see locals as well as tourists collecting seafood among the rocks. If you want to have a taste, a lot of the seaside restaurants get deliveries straight from the diving women.

The trail will lead through some smaller hills and fields. Jeju's climate can be near-tropical in summer, but it really depends on what part of the island you visit. While the south sports palm trees, citrus fruits and cacti, the east coast is more of a carrot fields and pine trees kind of region.


There's a lot of stray dogs running around. Don't worry, they've got better things to do than chasing after humans. :)


Another sign to watch out for are these symbols, guiding the way in places where ribbons won't quite cut it.

As you follow the trail, you'll also visit some smaller villages with traditional houses made from Jeju black stone. There's even a fortress just before you hit upon the next larger settlement.


The fortress is a historical site, but people are still living all over the place.
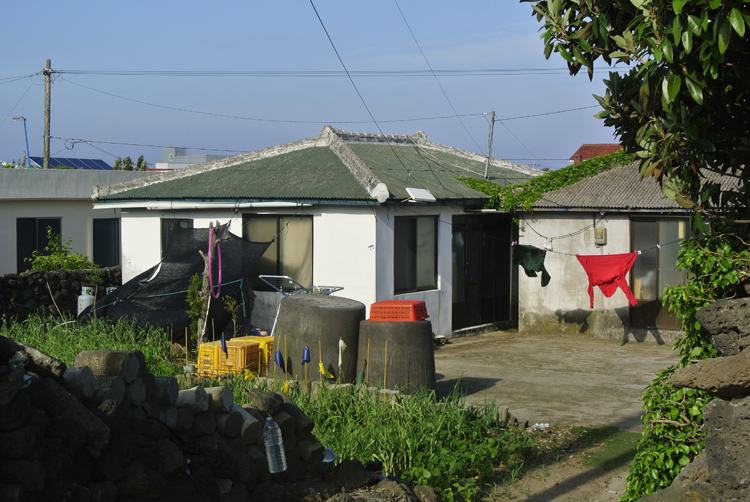

Housing from a generation after the stone wall houses. There's so many of these small little houses all over the island, with the roofs painted either green, red or blue without exception. One housing unit consists of several of these small buildings - one for living, one for storage, one for cooking/working, for example.


Sometimes the color combinations get ambitious.


After about one hour of walking through hills, fields and villages and after crossing through the fortress, you'll reach the coast again at Hado-Ri. You can't miss the sign.
Smaller than Sehwa-Ri, it sports a beautiful beach at the end of the Olleh Gil as well as some old-fashioned guest houses in stone houses.


If you're a bit tired from literally no walking, go have a drink at one of the seaside cafes. Personal recommendation would be the Cafe Isla right there after you've seen the large 'Hado' sign - the couple leading the cafe are avid travellers and their menu card is all the more rich for it.


Found one of the crochet mobilees sold at the fleamarket in Sehwa. Isn't the diving woman cute?


Right on cue, we spotted a whole troupe of diving women / haenyeo after leaving the cafe to follow the coastline road again. They can be found easily - you'll hear the high-pitched sound of their breathing even from very far away. At first, I thought I was hearing sea gulls, but since the haenyeo don't use any diving equipment beyond glasses and have to hold their breaths for a long time, the first intake after reaching the surface is audible before you can even see them. 

Considering that most of these women are well over their fifties, the bodily work they do is even more impressive. 


Another half hour of walking brings you to the beach of Hadori. There's canoes to be taken out into the water, so you might want to make a longer stop here.

Hadori sketch from spring 2016

After Hadori, the 21st Olle Gil continues along the beach, then moving inwards again and up one of the larger hills (Oreum) of Jeju island. 

We were in a hurry, so we didn't follow the way to its end on that day.
Made it home just in time to watch the sunset and give some love to our lonely cat. 

The view from the Bistro Gris ~ 

That's it for this little photography and illustration heavy blog post. 

I really love the region we live in - and Jeju island in general - so I'm happy I could do this little introduction!


Below is a snippet from a webtoon I'd been drawing in 2014, retelling my first time traveling to Korea and Jeju (and Asia in general) with a friend and meeting my now-husband (then-hostelstaff) while doing so. Thematically relevant. Totally.


19 May 2016

Innisfree Mineral Single Shadow Review - Eyeshadow Palette and Simple Daily Look

It's been a while! I've been sick for quite some time this month, so I didn't seem to find the time to do a blog post, despite having all the pictures at the ready...

But now there's really way too many pictures dying sad slow deaths on my harddisc, so here we go!


As you might know, I do use a lot of Innisfree's Mineral Single Shadows. While I prefer the Aritaum Mono Eyes Shadows when it comes to pigmentation, I like the more natural shades of the Mineral Single ones better for everyday use.

So recently I took the plunge and bought a large palette case to organise my stash.

This review is a two-parter: A quick look at the palette itself, and at one specific color that I've been loving recently!

  
First, the palette. As with a lot if not all innisfree products, the design is really simple, with an ivory base color and the logo.

The case does feel a bit clunky, since it's so big. The lid closes very, very securely, aka: I can't open it without nearly breaking off my nails every single time. I mostly just leave it half-closed. Despite that, the case feels sturdy and quite luxurious for the price of 10,000 Won.

There are two other sizes available: A six slot one for 8,000 Won and a three slot one for 6,000 Won. So if you've got a lot of shades and want to organise them without transportability being an issue, you might want to get the largest one. ;)


I've chosen the largest one, with a total of 12 empty slots, one of which is occupied by a black sponge thing to... I don't know what that's really supposed to be. To tap off excess powder? To 'clean' the brush? I'll remove it soon and put another color in that slot, as it's completely useless in my eyes.

Selling point for me was definitely that huge mirror. I now do nearly all my makeup with just that palette propped open on the table.

A quick look at my color selection: You can see I'm a warm color type of girl. Leaving out that odd indie pink shade, I mostly own bronze-brown-orange hues. I've accumulated these over the last three years, so the palette contains shades from the old as well as the new formulations (which, by the way, are a lot better than the old ones).

My most used shade is the one still in its own case, though, since I want to be able to toss it into my pouch if needed. The Mineral Single Shadows come in these small pots that have a little hole on their back that makes depotting very easy - just insert something like a needle into the hole and push, then use the glue in the pot to stick the eyeshadow into the palette.


The palette comes with a double-ended brush that was a positive surprise. While one side is a good ol' sponge applicator, the other side sports an actual mini brush. The bristles are soft and the brush is all nice and fluffy, just large enough to do some emergency blending.


I did go ahead and decorated the case. Huge white spaces do that to me.


The color I wanted to swatch for you is the deep red one in the picture below.


The new shade selection of the Mineral Single Shadows is divided into four parts: A group for matte shades, one for shimmer, one for glitter and one for 'trend' colors that are switched out every season. The red color was part of the Trend selection of last year's autumn release and is called 'Camellia Garden at Dawn'. 

Below you can see the current spring trend colors (I believe they will switch those up soon?) 
I'm eyeing the one in the middle of the top row, since it's called 'Soft Banana Pancake'. :D

Official Innisfree Homepage
While I do own my share of reddish eyeshadows, this one has turned out to be the most wearable for simple, daily point makeup while still being really, really red. Despite being a fall color, it's just bright and shimmery enough to go well with spring or summer, too.


It isn't leaning too much into a burgundy wine color, and has no cool undertones. There's a subtle, slightly golden shimmer and the pigmentation isn't too intense, so I can pull off a one layer wash all over the lid.


I mostly like to use it as a point color at the outer edge of my lid, though. Especially since my fringe is growing out and hiding my eyes, a little splash of color helps to bring them to the foreground.


The new formulations of the Mineral Single Shadows are buttery and hold up really well. I don't need to use an eye primer for these. For a more intense color, you need to layer two or three times.


This is my go-to eyemakeup look when I'm pressed for time, but do want to look like I have makeup on (as opposed to a more natural look).

A wash of my all-time favorite shade all over the lid (the old #22 Cashmere, which has been reformulated and is now shade no #3 of the Matt selection. Looks slightly lighter than the old one, though!) then adding #8 on the outer triangle of my eye, blend to the under eye. Tightline with either a gel liner or, in this case, the Aritaum Micro Brush Pen Liner in black for a very thin eyeline.

To finish the eye makeup, I only add mascara (Innisfree Microcara in brown) or leave my lashes as they are since I'm lazy.


On my lips is the Innisfree Glow Tint Stick in #6.

That's it! Very simple and quick.

Would you like to see more swatches, especially from the new range of eyeshadows? :) I'm terrible with eyemakeup, but swatching, that I can do!

Thank you for reading and see you soon!


10 May 2016

Etsy Update - Spring Beauty Illustrations

IT'S SPRING!

Spring is my favorite time of the year. Until summer rolls around, then I might be just a little bit more in love with that season. Because ice cream will be happening a lot.


Anyway, this is just a little update on the illustration and Etsy shop front. Most of my commission works have been in black and white (for coloring books, which are a lot of fun but take forever to do...) so I was all the happier to take my free time to create some colorful, cute makeup illustrations.

Coloring books with a doodle theme are the best!
But also challenging because how do you even come up with 50 different patterns??
Korean brands are very special edition happy, and especially VDL and Laneige have got me drooling with their gorgeous Pantone color inspired collection and their two-tone makeup products respectively. Too bad that they're two of the more pricier brands on my radar - so instead of going out and buying all the things, I soothed my cravings with drawing. For now.

The Serenity version original (already sold, thank you! ^_^)
VDL, what are you doing to me.... I really liked the look of their brand model, Sohee, so I added a little mini portrait inspired by her makeup and cat eyes. Some Innisfree eyeshadows and a lipstick made it onto the card as well, as did the Laneige Water Bank cream I'm currently using a sample of. And macarons and cupcakes and shading sticks and coffee cups.......

I actually wanted to create a spring version of my makeup illustrations in just cherry-blossom-pink, but then remembered that Rosequartz would be a good choice, too, since it's the Pantone color of the year. And then I just had to include a Serenity version as well! Which lined up really nicely with my current Korean makeup brand obsessions...

Aaand the Rosequartz version. Lots of blush and nail colors and lip products,
 as well as the ever present sweets.
The Rosequartz version thus features the mentioned cherry blossoms, and some rosequartz crystals for good measure. But mostly I went into some of my favorite rosy lip products, with a Mamonde Creamy Tint Stick and an Aritaum Water Sliding Tint. Mamonde features again with their Rose Water toner in the bottom right corner. And then there's Laneige with one of those gorgeous Two-Tone Bars. I just can't decide what color combination I should get, so for the moment I'm stuck with imitating the two-tone look by slapping on two different lip products.

Rosequartz pocket mirror with some of the illustrations arranged around the mini portrait.
As the Serenity illustration featured an actual person inspired mini portrait, I wanted something similar for the Rosequartz one. At the time of drawing these, Descendants of the Sun was all the rage in Korea, with everyone and their mother telling me to watch it. I couldn't get past the major cheesyness, but all the pretty swept me up anyway. So there's a mini Song Hye Gyo, which actually fits perfectly since she's Laneige's main model. Yay!

I did combine both portraits for the textile print this time.


Now I'm nearly through with my four seasons series. Only summer is left, and that will be a blast because ice cream, watermelons and bright colors!

I also added a little flower one because I needed gifts for mother's day :D
On the topic of summer: I'm working on new illustrations for our menu card at the Bistro Gris. Our wine card is getting ever the larger, and summer also calls for more sugary and freezing cold coffee drinks. And Sangria.


Also looking forward to drawing the food portion, since I've really enjoyed drawing desserts lately.


And when I'm not drawing, I'm decorating, DIYing and gardening. And you know, serving customers and cooking and baking. I might need a day off soon. :)


I hope you're having a great spring! May the weather be with you!


27 April 2016

Makeup Review : Innisfree Glow Tint Stick in #6

Finally, my review for the other shade I got from innisfree's Glow Tint Stick line.

I'd planned to get this up just after the one for the Glow Tint Stick #7, but the month just flew by. At least I remembered to scan the accompanying little illustration this time around!


Shade #6, "Warm Coral-Shine Spring Sunset" - or something like that. Innisfree's shade names get harder and harder to translate - caught my interest as soon as the promotional images were released. A warm, slightly orange-ish and bright red.

Official swatches for the Glow Tint Stick
But there the confusion already began, because if you compare the official swatch pictures below with the promotional image featuring brand model Yoona, shade #6 looks a lot brighter and glaring in the above!

Official promotional images for shade #6
I was confused, but not too worried, as both color variations would be up my alley. I was hoping for something more on the warm-red front than the bright-orange-red front, though, because good, warm reds are a bit hard to come by.


The packaging is, of course, exactly the same as in my previous blog post. A long, slender stick with a twist-up system that doesn't allow the product to retract.

The description on the packaging stresses how important it is to not twist up too much product. Never more than 1mm, though I mostly get by with even less for a full coverage application.


The shade is indicated both on the colored caps and the bottom, where product number and name are printed in very, very small letters. *squints*


I went with the two brightest shades from this release. Both #6 and #7 are more summer than spring shades in my mind - I was craving summery temperatures, I guess!


Swatching revealed two things: That the shade was more on the orange side than the official swatches indicated, and that it would be impossible to get the same deep coverage as in the promotional picture. Layering the product does help, though, and the orange hues get redder and deeper instead of just brighter.

There's some shades that look nearly the same no matter the lighting, but this jumps from a true orange in sunlight to a warm coral in indirect light.

As I love orange/coral lip colors, that was no problem for me personally, but if you're looking for a color exactly identical to the one in the promotional material, be warned!

One layer in direct sunlight.
Leaning orange and a bit of piling into my lip lines.

The pigmentation for this product is great, but at the same time it gives a very transluscent finish - an interesting combination and very forgiving on dry, patchy lips! The original lip texture shines through, but is smoothed out and moisturized by the product.

While the application is simple and precise thanks to the small tube, you can see that the Glow Tint Stick doesn't apply perfectly evenly, piling up against some of my lip lines. It isn't noticeable if you don't point a camera with a macro lense at it, though. ;)

#7 did apply more evenly than #6, strangely! It's a tiny difference, and I only noticed after looking at the pictures.

One layer, no direct sunlight.
The color does look deeper, closer to the promotional images with the model, but less bright
than the official swatches.
The piling gets a bit worse with each layer, but can be smoothed out if tapped on with finger.
True to its name, the Glow Tint Stick gives a shiny finish. The slightly sticky texture warns of what is to be expected of nearly every glossy product: It transfers and does rub off when eating or drinking. It leaves an even stain in a coral-orange tone that lasts for several hours, though. And as the packaging allows for taking the Tint Stick with me in my bag without fear of it breaking or leaking, reapplication was very easy.

No lip brush is needed for a precise outline, which makes the Glow Tint Stick line perfect for traveling or quick application.


Here's another example of one layer versus two layers! Both taken in indirect sunlight.

One layer already gives a nice punch of color, moisture and shine, and I often use this for simple daily looks, as the orange in it isn't too neon-y glaring.


While even two layers don't give the deeper red I'd hoped for, I'm still really happy with the shade! Sometimes orange lips, especially saturated ones, are hard to pull off, but Glow Tint Stick #6 walks that fine line between an orange and a red that puts it into the easy to wear, fits-nearly-everything category. This would be perfect if you have neutral or warm undertones!

I can mostly tell if I suit a color if the pictures for reviews turn out well - this time I had so many to choose from where my face didn't look totally awkward, so this shade is a winner. :)


Overall I totally love this line, despite the slight inaccuracy in their promotional swatches (let's be honest, which brand does actually get those exactly right?) and the lipline-piling. Those get balanced out by how gorgeous the actual colors are and how moisturizing and shiny the product is!

I wish the shine would last through meals, but am happy with the stain it leaves behind.

The packaging is sleek and sturdy, easier to use than I'd hoped and perfect for someone who values precision.

Confession: I've picked up two more shades from this line during their recent 1+1 event, so I'm now the proud (and slightly guilty) owner of #2, #3, #6 and #7. Owning this many colors of one and the same product range is a first for me!

#2 and #3 are quite similar shades, so if you'd like to see swatches, I'd combine those into one post. Both work really well in combination with the two brighter shades, too!


Thank you for reading and see you soon with more reviews! May will be a lot calmer than April, so I hope to get a lot of blogging in~


9 April 2016

Makeup Review : Innisfree Glow Tint Stick in #7

Welcome to another review!

There should be a time when I get tired of lip products. Tints, lipsticks, lipbalms and whatever mix of those brands come up with should have a limit, but well, innisfree got me hook, line and sinker with their newest combination: A liptint in stick form that's shiny like a gloss and moisturizing like a balm. There you go, lip product world.


It's no secret here on this blog that I'm a devoted innisfree follower/fan/slave, but I've got my reasons! Especially their lip products have never disappointed me.

I loved their lipstick collections, from the matte Creamy Tint ones to the shiny Color Glow and super creamy and beautiful Creammellow. Their old Vivid Tint Rouge line were my very first step into the world of Korean Makeup, and their Eco Flower Tint is something I've been using every week for about a year. The Real Fluid Rouge is my fave for high-maintenance but gorgeous oil-tint like lips, and they always have very pretty shade selections that go beyond the usual red-orange-pink scheme.


So when the Glow Tint Sticks came out, I was sceptic: What could this bring to my quite full lip product table that wasn't there before?

The packaging principle is not completely new, but a very interesting take on some ideas we've seen before. It's a a very thin tube, with a twist-up mechanism similar to the ones seen on the Aritaum Water Sliding Tints, in that once twisted up, the product can't retract. The very small surface of the product makes for an easy, precise application, but I'm forever anxious about twisting up too much product! About 1mm is more than enough for a full layer.

The twist-up principle and solid form for a lip tint make it an easy product to just toss in a bag and take with me (these have found their place in my pencil pouch). It can't leak, it can't break - so while the twisting intimidates me a bit, I like the packaging in general. The small tip is also a good point in my book, because I hate nothing more than a wobbly full lip - this is one of the few lip products I don't need a lip brush to apply! Again, that makes it an ideal travel companion.

I prefer to first tap it lightly over my lips and then glide it on top of that thin layer for a smoother application. The final feeling on my lips isn't sticky - it's shiny without giving the feeling of a gloss.


Then, the color range! Inspired by a sunset, so the promotions for these looked super pretty!

While most Korean brands do feature one or two coral shades in their line-up, I just love that there's a strong focus on these here. It's a perfect selection for spring and the coming summer, and it does take me out of my color funk in giving me some shades that I don't own in any other form. While some of the colors look very similar in the official pictures, swatching in store showed them to be a lot more varied (which is maybe bad news for those of you who have to buy online) and especially the lighter shades come well-equipped to suit different skintones and undertones.

I own two shades from this line. The first I got was shade 6, a gorgeous warm red-orange. As I fell in love with the texture, I did plan to get either shade 2 or 3, but then, strangely, while swatching in store I decided to go with shade 7 instead.


I'm a bit strange when it comes to pinks, finding shades that I like but, in the end, rarely wear. For daily makeup, I prefer warm coral hues or reds, and pinks are a bit hard to pull off for me. But I really liked how this one was bright, a hot-pink that didn't lean too cold and with no hints of fuchsia. (I do own a fuchsia lip product, and while I adore the color, it's just so hard to find a look and time it actually suits...)


Shade 6 on the left, shade 7 on the right. The cap indicates the color accurately.


How do I even translate these names...? Shade 6 is something like 'Warm Coral Spring Sunset' and shade 7 'Pink Dyed Cloud' or 'Pink Colored Cloud'.

Now for the swatches:

I'll post the swatches for #6 in my next review (combined with eyeshadows), so here we go with the pink shade #7!


The color reminds me of a very ripe watermelon. That's the most accurate thing I can come up with!

As you can see, the product does smudge a bit around the tube - I pick that up with my finger to tap it on as a first layer on my next application.

Another thing that caught my interest for this line was the name. The 'Glow' made me immediately remember the Color Glow lipsticks which (sadface) have disappeared from the official website some months ago. So I was guessing that these are a bit of a replacement for that lipstick line.

The finish of the Glow Tint Stick is even more glowy, though! It's closer to the result you get just after applying the Vivid Tint Rouge lip tints and I really like how it combines high pigmentations with a transluscent finish. It feels very thin and light on the lips, but still packs a punch when it comes to color.

The translusceny makes it look natural despite the bright shade I chose.


The shine does transfer when drinking or eating, but (I guess because this is one of the darker colors) the stain it leaves behind is quite strong and lasts throughout the day.

The stain is exactly the same color as the initial application, and the product stains very evenly. Irregular fading or splotchy stains OR lip line settling are a pet-peeve of mine and I'm so happy that the Glow Tint Sticks don't do any of that.

It's moisturizing, too, perfect for hiding my dry, flaky lips.


Here's the final look. So happy with this color! I will absolutely get at least one more, probably #2 or #3.

This just combines I lot of things I look for in lip products:

- even, long-lasting stain
- precise application
- robust packaging
- shiny, but not sticky or heavy texture
- moisturizing

These retail for 10,000\, containing 1.8 g of product. I'm quite sure that innisfree will expand on this range - maybe after the whole 'Sunset Theme' there'll be a 'Sunrise' one as well? They do come out with new shades for their established lines often, so I'm crossing my fingers!


Here's the product round-up! I've been practicing when it comes to makeup, and am now more comfortable with the whole eyeshadow-eyeliner-eyebrow business. Blogging and taking pictures of my face really help. ;) Still not good, but hey, progress!

See you soon with my next post on the Glow Tint Stick #6 and another reddish eyeshadow that I love wearing in combination with that shade.